
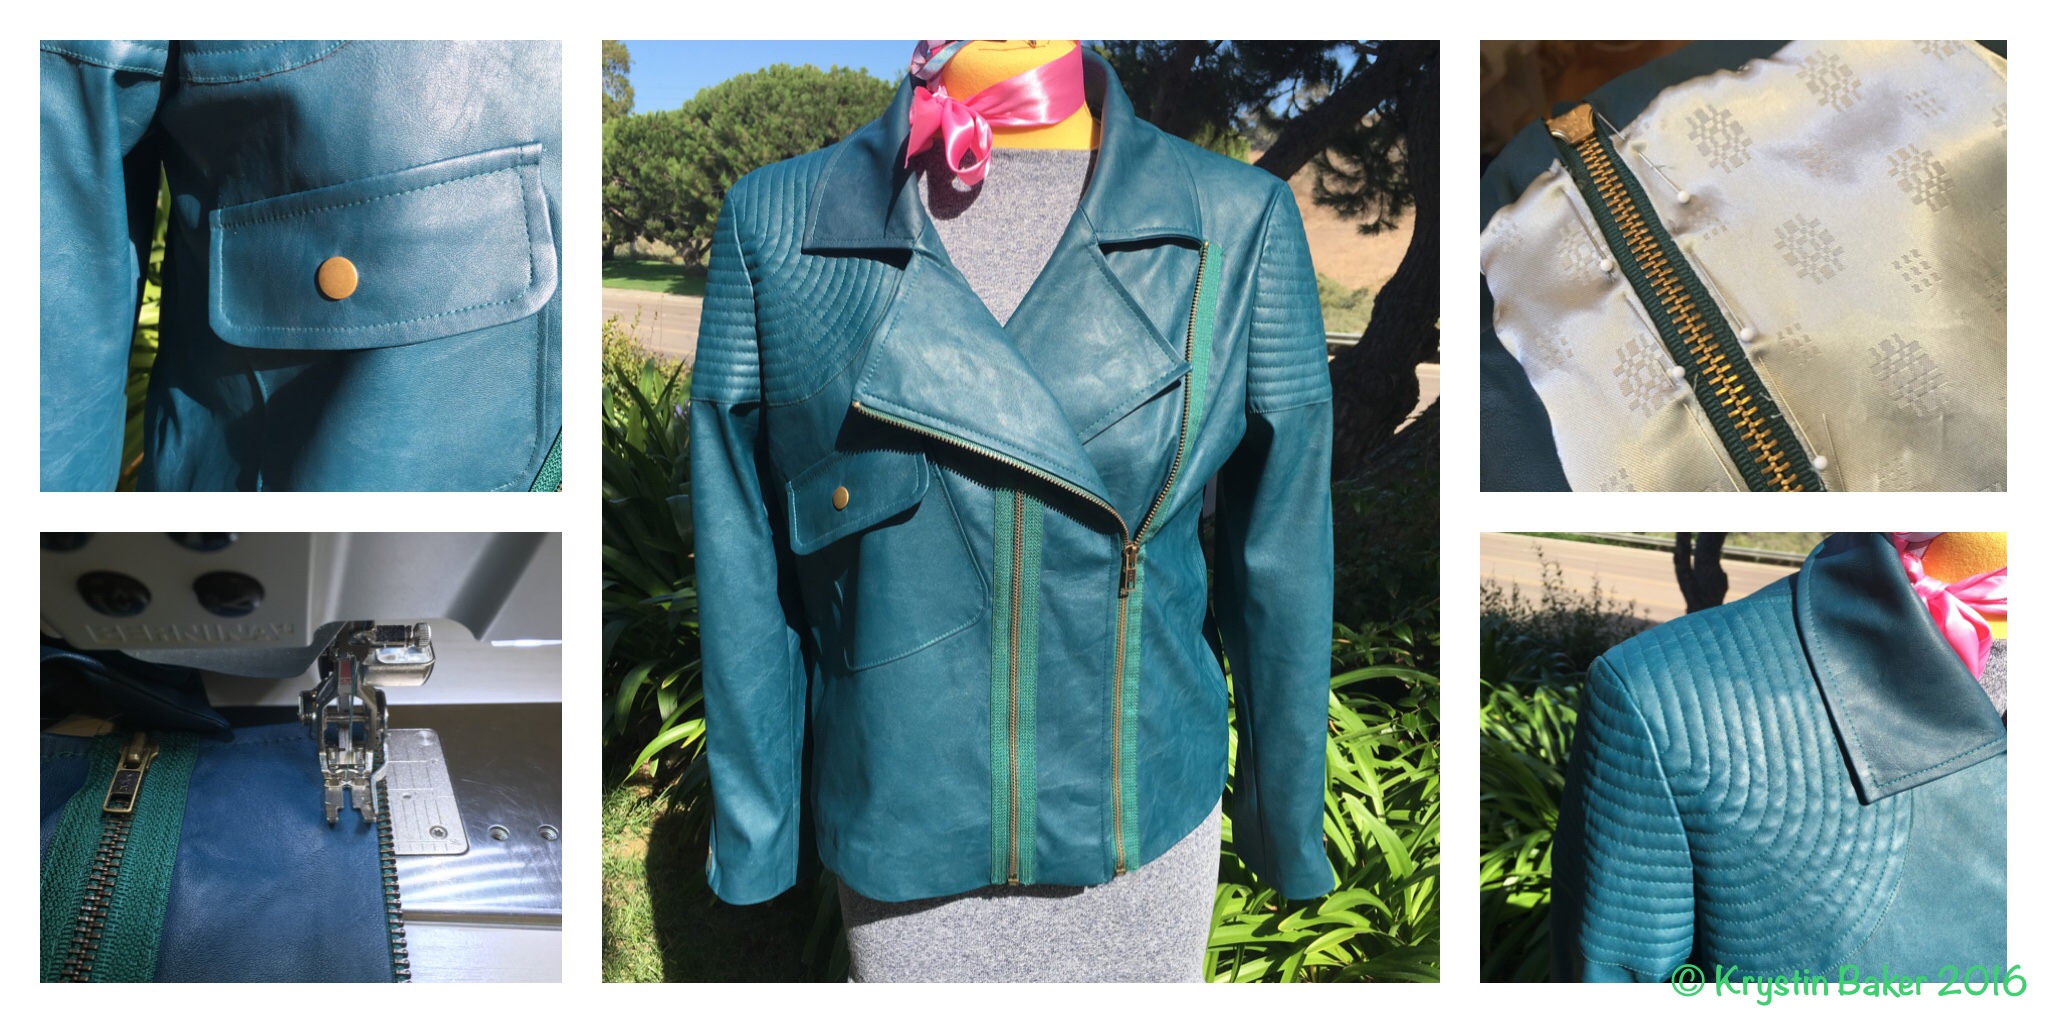
If you’ve been following my Facebook, or Instagram, you probably knew this post was coming … I’ve been building on leather motorcycle jackets since my New Year’s post. This project was one that I identified around that time, but lacked the confidence to dive in right away. This design is from the January 2014 issue of Burda Style magazine. It is a motorcycle jacket featuring an additional decorative exposed zipper, and quilted details on the shoulders and arms. It is a “masterpiece” project.


I purchased about 4 yards of faux leather from EOS in a teal green for this project, plus a possible coordinate. It’s actually one of a set of coordinating fabrics that I have yet to complete all planned pieces. The faux leather is backed, making it soft and wearable, but it also has some stretch and has great qualities that mimic lambskin. Honestly, I find faux leather to be more challenging than real leather due to its temperamental relationship with heat. It’s less forgiving than real leather, and is prone to melting.
")


Supplies
Before jumping into the assembly, I’ll briefly discuss the tools and materials employed in this project, here’s a quick inventory list:
- Fabric: Supple poly-backed faux leather from EOS, vintage mint jacquard lining (stash)
- Interfacing: black medium weft from Fashion Sewing Supply
- Cutting: Gingher fabric shears, Fiskers thread nippers, Olfa 45mm rotary cutter (and mat)
- Pattern Tracing: white butcher paper (Smart ‘N Final) and Frixion erasable pens, Dritz Refillable Chalk Pen
- Adhesives: 3M spray quilting adhesive, Dritz “Stitch Witchery”, Dritz seam tape
- Pressing: Rowenta Steam Iron, wooden tailor’s clapper & 100% silk organza press cloth
- Thread: Guterman all purpose in teal (outer shell) and mint (lining), tension lowered (upper thread) by about 20% for the faux leather/no adjustment for lining. Stitch length at 3.5 for faux leather seams, 4.0 for topstitch and 2.5 for lining
- Zippers: 2x 22” Vintage brass YKK separating zipper (eBay), 2x Vintage 8” vintage brass metal zippers (sleeves), Needle Nose Pliers with teeth and without teeth
- Fasteners: 1x Brass snap set (Dritz) & snap setting kit
- Needles: Schmetz 70/10 all purpose, general purpose hand-sewing needles
- Machine: Bernina 830e with dual feed
- Feet: machine at 30% pressure for faux leather (even lower for quilting)
- Bernina 37D, 1/4″ quilt piecing foot with dual feed plus seam guide attachment set at 5/8″
- Bernina 4D, 3/8″ zipper foot with dual feed
- Bernina 10D, 3/8″ edge stitch foot with dual feed
- Bernina 57D, 1/4″ quilt piecing foot with integrated seam guide and dual feed
- Bernina 51, 3/8″ roller foot
- possible substitute is a walking foot attachment for machines without dual feed. You’ll need an edge stitch attachment, too.
If you were to ask me “on this list, what specifically makes or breaks the quality of the finished project?”, my answer would be the selection of sewing machine feet, the organza press cloth and the tailor’s clapper. Specifically, your machine attachments will affect how the tackiness of the leather drags against the foot. If you don’t test your setup beforehand, you may wind up with rippled seams and/or puckering (even with dual feed – check your tension and foot pressure, too). I’ve included my settings above. In addition to the attachments, your pressing station is important. If you don’t have enough heat, your seams will not sit flat and will not look professional. The Catch 22 here is that faux leather loses all shape when heat is applied, as well as melts if in contact with the source. To prevent this, you need an organza press cloth, a sufficiently high dry heat setting, and a tailor’s clapper. I set my iron halfway between 2 & 3 (no steam), placed the organza over the area to be pressed, pressed, and then IMMEDIATELY applied the tailor’s clapper until the temperature dropped enough to set a crease. You can use this method to absorb ease and rippling, similar to how you would ease fabric. On the pockets, I did this repeatedly to flatten and soften the edges.
Preparation
I traced the pattern off, per instructions and added my alterations and seam allowances, but omitted. I went with my usual Burda size, but omitted the CB seam on the outer shell. I used the recommended seam allowances everywhere, except the pocket pieces, collar pieces and upper neck edge. For those, I used ¼”. I also didn’t add any SA to the outer edge of the quilted pieces because they are to be edge-stitched to the supporting fabric anyway. This makes it much easier to piece these tight curves and ensure a clean turn-out without additional seam thinning. I also followed the recommended addition of the interfacing to the identified pieces.
The Pockets
The very first step involved attaching the pocket. It became immediately obvious that the weight of these pieces needed to be supported better, so I added a large supporting piece of fusible interfacing to the body of the jacket, extending the upper edge to the collar to prevent drag ripples. After pressing the seam allowances (and applying the tailor’s clapper), I used seam tape to place the pocket before edge-stitching into place.
Quilting
The next steps build up to the process of quilting the appliques on the jacket. I used 1/8” cotton quilt batting between the layers (no seam allowance), and quilter’s adhesive to carefully apply the layers prior to top-stitching, leaving a very scant exposed edge of the applique towards. Once the appliques were placed, I edge-stitched the outer edge with a dual-feed edge stitch foot. Once the edge stitching was completed, I proceeded to topstitch the applique in concentric circles (starting from the edge, working in) with 1 cm spacing between. This is a convenient spacing as it is the same as the single-sided width of the foot (I used the roller foot, and further reduced the presser foot pressure to its minimum setting). An important note here is to generously apply the adhesive so that nothing shifts, and keep the layer taut as you stitch, otherwise you will wind up with bunching and ripples.
Sleeves
It was around this step that I took a 2 month hiatus from this project. The zippers I ordered were taking longer to arrive than expected, and I needed them for the next step: assemble sleeve & apply quilting applique. Once I got back to this project, I needed to install the zippers – so I whip-stitched them to the needed length and cut them down (removing extra teeth where necessary). The only tricky part to this was keeping the edges aligned so that the zipper could be topstitched. This was challenging because I could not baste the seam, or pin through my faux leather. I decided to “tape” the seam in place by using small strips of wash-away stabilizer with a sticky backing, and then very carefully pin the zipper to the seam allowances only. I used a zipper foot to sew through all thicknesses, and then removed the stabilizer.


Body Assembly
Setting the sleeves and remaining jacket body assembly didn’t require any additional care that normal, other than pinning in the seam allowances and being careful not to pin the outer body shell. Every seam I set with the tailor’s clapper and topstitched before moving on (with only a couple of exceptions, one being the sleeves and the other being the neck edge of the collar).


Zippers
Once the collar was attached, I needed to trim the zippers and apply. Separating zippers need to be shortened from the top. This is accomplished by removing about 1” of teeth above the required length, minus ¼”, and relocating the upper stops. Use needle nose pliers to do this … use ones with teeth to pull zipper teeth (vintage and commercial zippers are much tougher and will require a lot of force, the teeth will help you get a good grip), and use ones without teeth to carefully reposition the stopper without scratching it. The reason for making the zipper about ¼” shorter than the seam is due to added bulk near the seam edge. If you make the zipper too long, you will get an awkward exaggerated peak in the corners once you turn the garment out. I only relocated the stoppers for the functional zipper. For the decorative zipper, I simply pulled the teeth out to the edge of the top-stitching (since it would be encased, there was no need for stoppers)
After you’ve shortened the zippers, you’re going to apply the functional zipper in the traditional sense on the lapel size, but top-stitched as an exposed zipper on the body side. First, baste your zipper in place on the lapel and traced the zipper placement from the pattern to the body of the jacket with chalk. Use this as a guide to place the exposed zipper half. Edge-stitch the edge of the tape without teeth to the body, and then use a zipper foot to get close to the zipper teeth and sew a parallel row of top-stitching. Similarly, place the decorative zipper and top-stitch both sides in place on the lapel.


")

Finishing up
From here on out, it’s just finishing up. Sew the lining (yadda, yadda …) … and prepare to attach the lining and shell. This required some extra steps, too. One problem being the inability to hem the outer shell with an invisible hem. For this step, I used Stitch Witchery to fuse the hem, leaving about 5/8” seam allowance to attach the lining. I did this on the sleeves, too.
Typically, I do a “bagged lining” method for finishing up. First, I attach the lower hem edge of the lining to the body with a machine, and then attach the entire shell and lining together along the facing edge. I did it slightly differently this time – I attached the facing to the lining and sewed the entire outer edge in one seam – including collar edges. I turned out through an opening in the side of the lining, pressed, and topstitched. Once the main body was turned out and pressed, I pulled the sleeves through the opening (being careful not to twist), and machine stitched the hems.
The last step was the hand-stitching of the zipper lining and closing up the opening in the lining.


")

 with Zipper Foot (Bernina 4D)")

")


Parting Thoughts
After carefully considering the work that went into this project, and the finished product (even with it’s flaws), I’m very surprised by how well it turned out. When I started, I was not entirely convinced I could pull it off (hence why I did a faux leather jacket vice real leather). My confidence level is greatly improved, and I’m ready to take on some more aggressive leather projects … I’ve been working to get this skill level for over a year, and I’m confident to say that I’ve reached that next level!
MORE FUN TO COME!


Morgana
June 12, 2019 10:19 amThis is really stunning! I’m just finding your page. Nice work, and thanks so much for sharing your experiences, expertise, knowledge, and opinions. It’s so nice to see such a conscientious person so willing to share what they know. This jacket is spectacular and you should be very proud. I’m especially impressed with your color choices and attention to detail. Thanks!